A free, open-source radio control system you can build yourself
The transmitter
A 16-channel radio with a 5-inch touchscreen that you build yourself. Here is everything it does, what it needs, and how it compares with radios you can buy.
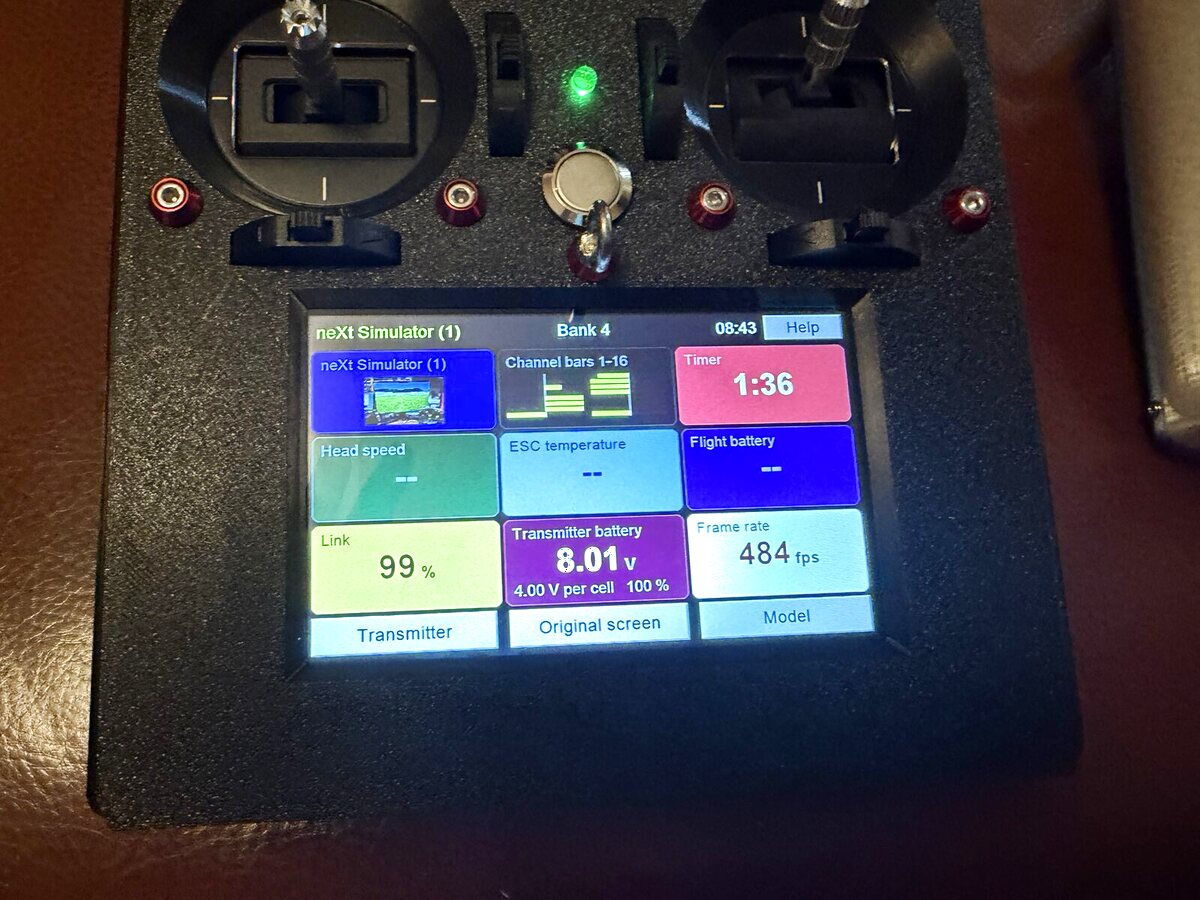
A Version 2 transmitter. The screen shows one of its own front-screen designs.
Version 2 is the Version 1 transmitter with a new 5-inch colour touchscreen. Two computers share the work:
The main board flies. A Teensy 4.1 reads the sticks, does the mixing and runs the radio link to the model.
The screen talks. An ESP32-S3 draws the pages and looks after WiFi, Bluetooth and updates.
Labels:New in V2Needs a V2 receiverNeeds the USB cable (receiver to flight controller)Not found elsewhere
At a glance
16 channelsAbout 2,000 steps each, sent in 12-bit slots.
500 packets a secondA fresh packet to the model every 2 milliseconds.
Frequency hoppingAbout 100 hops a second across 83 channels of the 2.4 GHz band.
5-inch touchscreen800 × 480 colour, with WiFi and Bluetooth.
Good sticks and switchesHall-sensor gimbals, 4 digital trims, 8 three-position switches.
90 model memoriesPlus as many backups as the memory card holds.
Updates itselfOne button, from the internet. It can update the receiver too.
Rotorflight at the fieldTune a helicopter from the screen, with a V2 receiver.
Talks to youSpoken messages, and a help page for each screen.
Free and openCode, circuit board, case and help texts.
From about £120 in partsApproximate, October 2026. See Build one.
Front screens
Choose what you see while you fly. Big numbers, your colours, your model's picture.
The original front screen
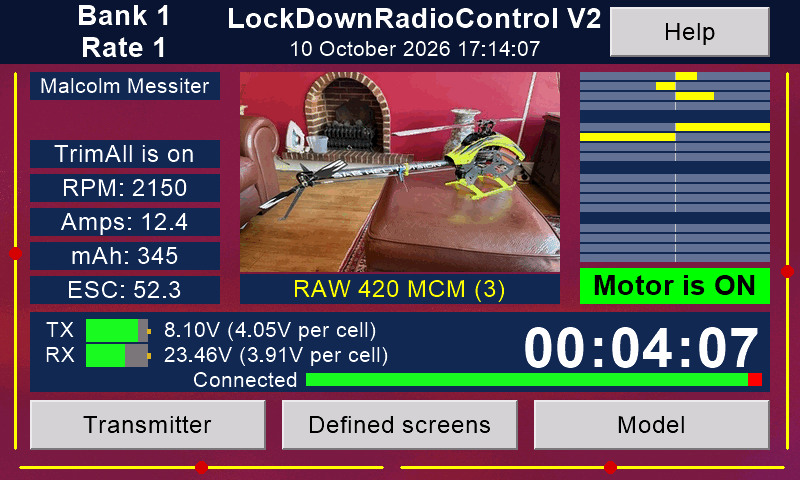
Everything at once: bank and rate, the model's name and picture, trims, channel bars, head speed, current, capacity used, ESC temperature, both batteries per cell, link quality, the timer and whether the motor is on.
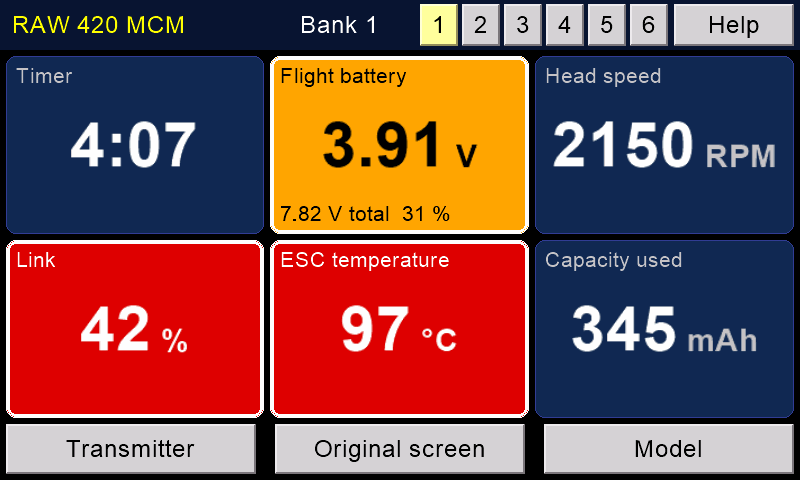
Defined front screens New in V2
Design your own front screen, with big, clear numbers.
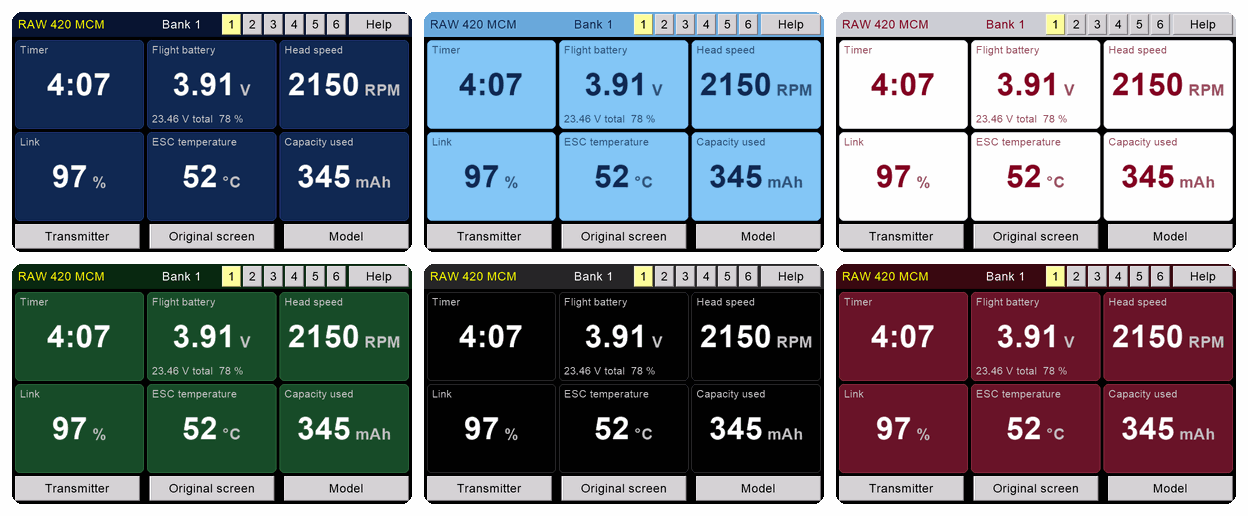
Keep six designs. Switch between them with one touch on tabs 1 to 6.
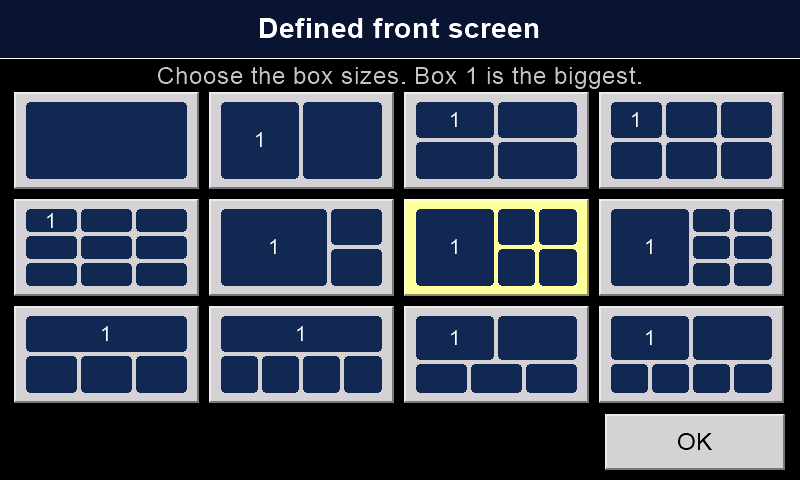
Pick one of 12 layouts, from one big box to nine small ones.
Each box shows one thing: the timer, either battery, the link, packets a second, head speed, ESC temperature, current, capacity used, bank, rate, motor, the clock, the model's name or picture, or channel bars.
On the ground, hold a box for 2 seconds to change it.
A box turns amber or red when it needs a look. The top line turns red for BATTERY LOW or NO LINK.
Themes and pictures
Twelve themes. Each is a panel colour with its own text colour.
Re-colour any theme with three sliders. Give each box its own theme.
Choose the picture behind the pages. 43 come on the card.
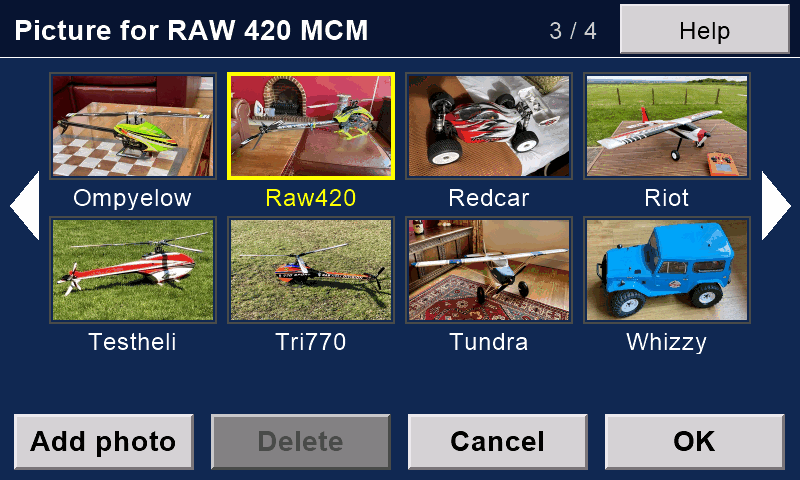
Give each model its own picture. It shows on the front screen.
Send a photo from your phone: press Add photo, scan the code, fit the photo in the frame, then press Send. The phone and the transmitter must be on the same WiFi.
One front screen, six of the twelve themes. The screen pictures on this page are drawn by the screen's own code, with sample numbers. The photos are real.
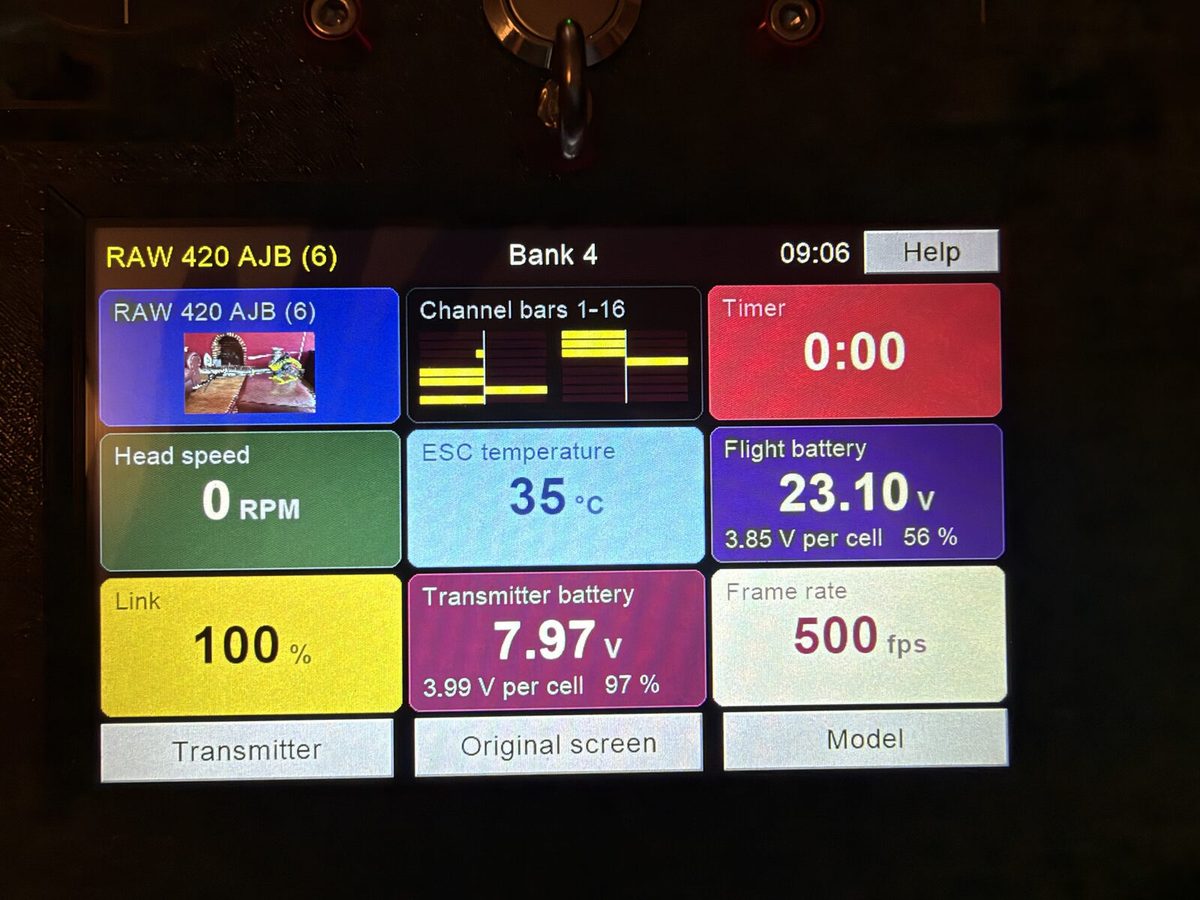
The original front screen, during a flight.A real screen, real model: 500 packets a second.A defined front screen: six big boxes.Nine boxes, with channel bars.The model's photo in a box.Boxes turn amber or red when they need a look.NO LINK: the top line turns red.Choose what each box shows.Twelve layouts.Twelve themes.Re-colour any theme with three sliders.The original front screen in another theme.A picture of your choice behind the pages.Give each model its own picture.Send a photo from your phone.
Flying and model set-up
Everything a model needs, on plain pages. Planes, gliders and helicopters.
Automatic model selection
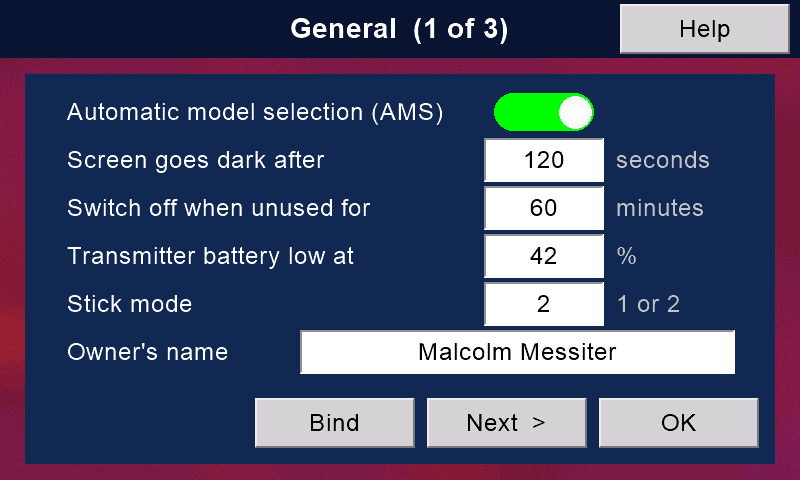
Switch on a model. The transmitter loads that model's memory by itself.
This is rare. Most radios only stop you flying with the wrong memory. Multiplex's SMART SX loads the right one with its ID receivers (some have a fixed ID, some can be set). Mikado's VBar Control does it another way: each model's settings live in its VBar unit. Ours learns the ID of any of its own receivers.
The Model IDs page lists every stored receiver and warns you of duplicates.
Models and backups
90 model memories. Rename them and give each one a picture.
Back up any model to a file on the card. Keep as many as the card holds.
Banks (flight modes)
4 banks per model. Each bank has its own curves, trims and mixes.
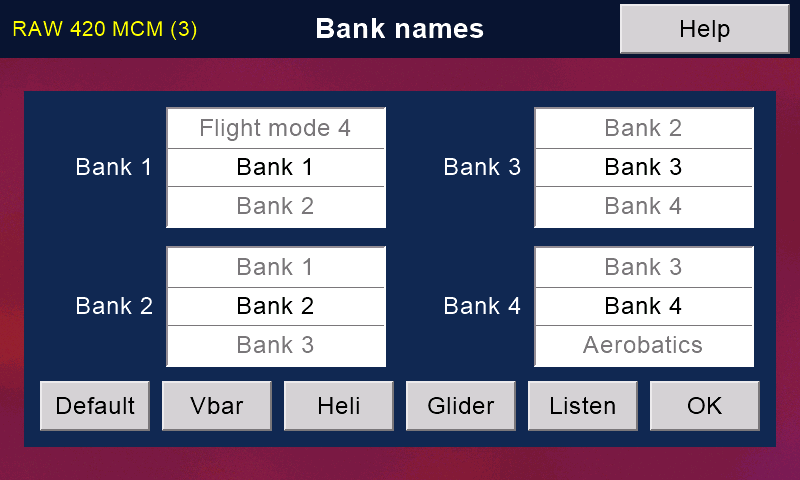
Name each bank from a list the transmitter can say aloud: Hover, Idle 1, Thermal, 3D and more. Ready-made sets for helicopters, VBar and gliders.
Rates, curves and expo
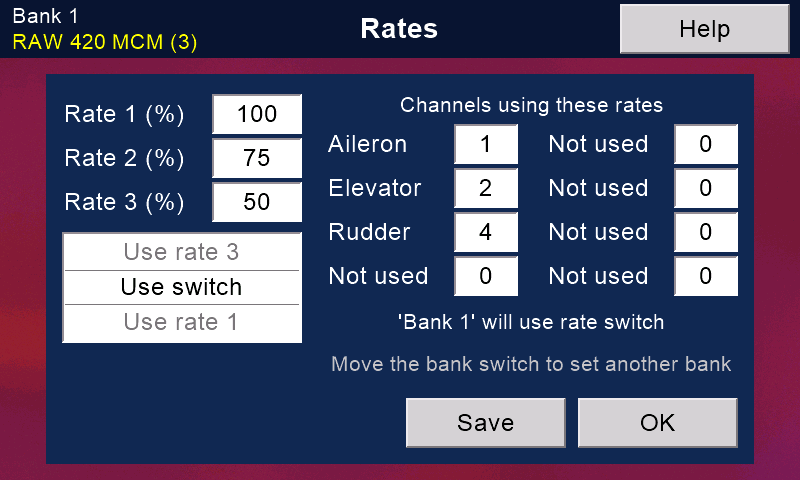
Three rates, from 0 to 200 %, on up to 8 channels. Choose them with a switch, or let them follow the bank.
A 5-point curve for every channel in every bank: straight, smoothed or exponential. Touch the graph to change it.
Expo from −50 % to +150 %.
Mixes and macros
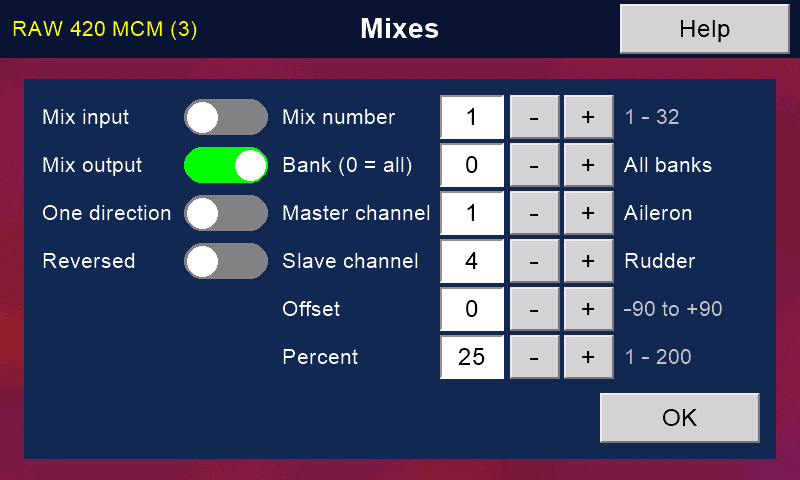
32 mixes, for one bank or for all. Enough for V-tails, flaperons and deltas.
8 macros: timed channel moves, started by a switch, with a delay and a length of up to 25.5 seconds each. Good for a snap roll.
Trims, inputs and slow servos
4 digital trims that speed up when you hold them, and trims on the screen as well.
Trims per bank, or copied to all banks. Set the trim step; 0 turns trims off (for flybarless helicopters).
One touch moves the trims into the subtrims.
Any stick, switch or knob can drive any channel. Rename any channel; the name shows everywhere.
Slow any channel down, per bank: flaps or retracts, say. The transmitter does it, so it works with any receiver.
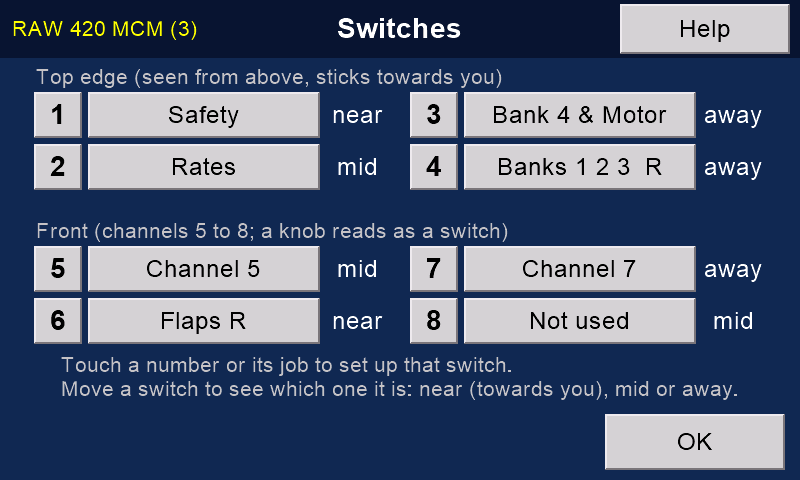
Eight switches, any job New in V2
Give each switch a job: Banks 1-2-3, Bank 4 & Motor, Safety, Rates, Buddy, or the input of any channel from 5 to 16.
Reverse a switch with one tick.
The Switches page shows where each switch is right now.
The four front switches can be knobs instead.
Motor, timer and failsafe
Bank 4 & Motor: one switch gives banks 1 to 3, bank 4 with the motor on, and bank 4 with the motor off. Handy for autorotation practice.
Flight timer: it runs only while the motor runs. It counts up or down. At zero it says "Stop flying!".
Failsafe: tick the channels, hold the sticks and switches where the model should go (motor off), and press Save while connected. The receiver keeps those positions.
A Version 1 receiver moves only the ticked channels.
With a Version 2 receiver every channel goes to its saved position, ticked or not. Hold every stick and switch where it should be, motor off, before you press Save.
With a Version 2 receiver on CRSF, the flight controller's own failsafe takes over.
Wireless buddy box
No cable and no extra hardware. Two transmitters are enough.
The instructor hands over control with a switch. A spring-return switch is best: let go, and control comes straight back.
The instructor chooses which channels the pupil gets, and whose switches count.
Nudge: the pupil flies, and the instructor can nudge the model with their own sticks without taking over. (Not on collective or throttle.)
Both transmitters say "Master" or "Buddy" aloud, so everyone knows who is flying.
Once it has the model, the pupil's transmitter loads it by itself. (Spektrum's Pilot Link avoids the need another way: the pupil's radio needs no model at all.)
Model setup: every page in one menu.Automatic model selection: one switch.Models and backup files.Name each bank; it is said aloud.Three rates.A five-point curve with expo.Mixes: 32 of them.Macros: timed moves on a switch.Trims, and one touch to subtrims.Slow servos, per bank.Any input to any channel.Eight switches: each job, and where it is now.Pick any job for any switch.Model options: timer, motor kill, warnings.Failsafe: tick, hold every control in place, Save.Wireless buddy, with a Nudge position.Choose the pupil's channels.
Rotorflight on the transmitter New in V2
Tune a Rotorflight helicopter at the field, on the transmitter's own screen. No laptop and no phone.
What it needs
A Version 2 receiver. The settings travel over the receiver's Bluetooth, not over the flying link. A Version 1 receiver cannot do this.
Rotorflight 2.2 or later on the flight controller.
The safety on, the model disarmed. With the safety off, these pages will not open.
The USB cable from the receiver to the flight controller, for setting up in-flight adjustments, and for the command line.
A first set-up with Rotorflight's Configurator or our phone app. The transmitter is for tuning at the field.
Fifteen pages, one menu
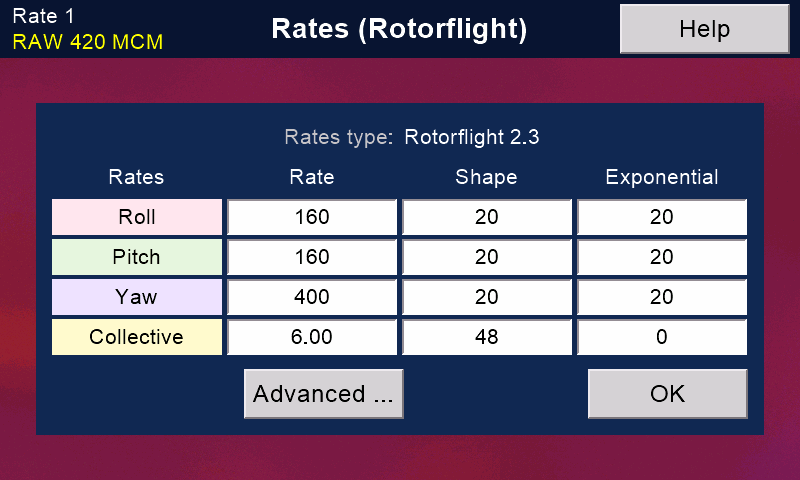
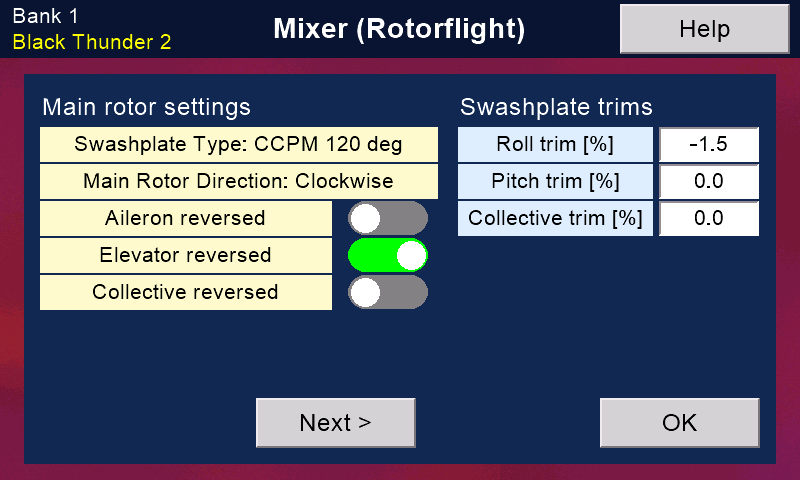
PIDs and Rates (each with an Advanced page), Governor, Rescue, Servos, Mixer, Gyro filters, Adjustments, Switches, Copy a bank, Battery, Black box, Calibrate, Settings and Command line, plus Backup / Restore.
Each page reads the flight controller when it opens. Save writes, stores and reads back to check.
A line under the buttons says, in plain words, why the model will not arm. Tap it to see every reason.
The Rotorflight menu. The yellow line says why the model will not arm.
The best bits
Back up Rotorflight
Not found elsewhere
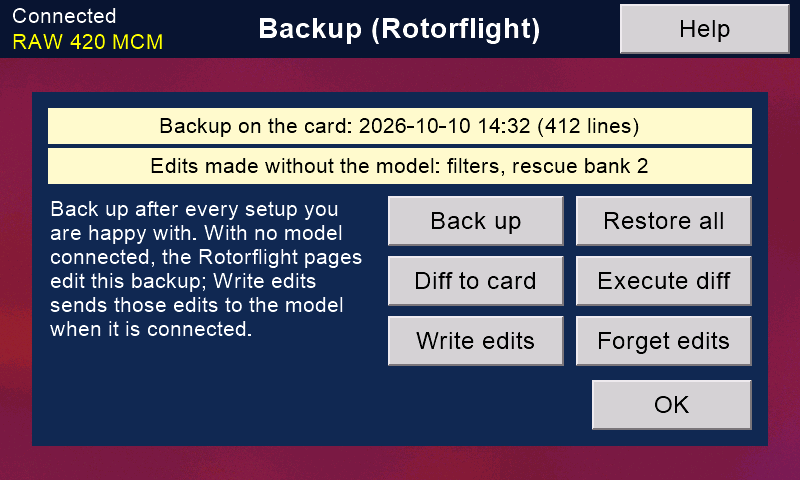
The model's Rotorflight tune and set-up, in every bank, kept on the transmitter's card. Ports, LED, GPS and ESC settings are not included. Restore writes only what is different and reads each one back.
With the receiver's USB cable, Diff to card also saves the whole set-up as text.
Edit with the model switched off
Not found elsewhere
No model? Every page opens from the backup and keeps your edits. When the model next connects, press Write edits.
Copy a bank, scaled for head speed
Copy the tuning of one bank into another. Tick Scale gains to rpm and the gains are adjusted for the new head speed. It reads back and compares.
In-flight adjustments
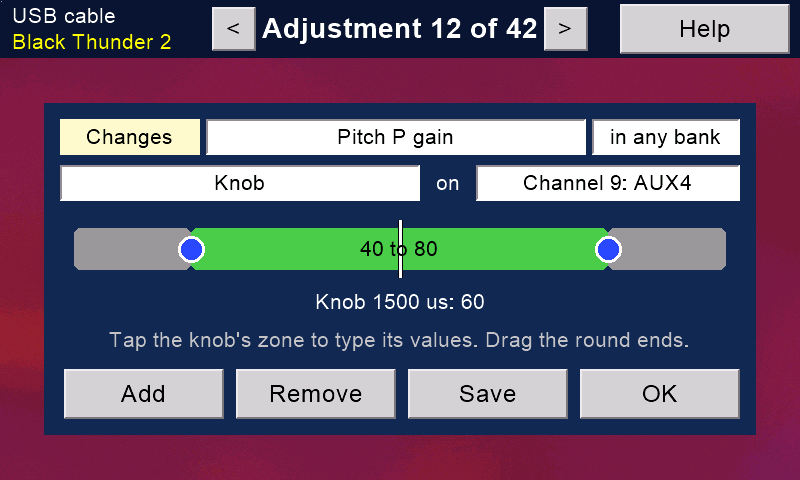
Needs the USB cable The cable is needed only to set them up. They then work in flight without it.
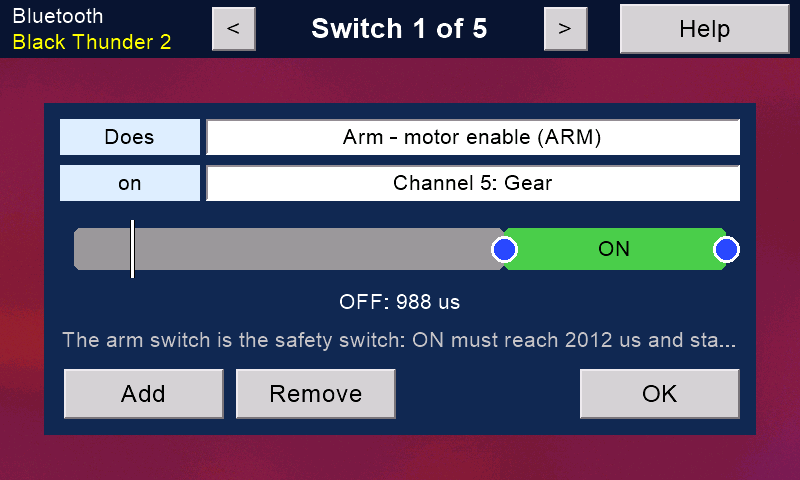
A knob or switch changes a setting while you fly. Drag the ends of the bar. A marker shows where the switch is now. Bank zones are matched to your banks for you.
Switches in plain English
Arm, rescue, self-level, beeper, black box and more. The arm switch is tied to the safety switch. A zone that would arm with the safety on is refused.
Rotorflight's command line
Not found elsewhereNeeds the USB cable
Rotorflight's own command line, with an on-screen keyboard. Diff to card saves the whole set-up as text. Execute diff plays it back.
A test of Back up then Restore all: Rotorflight's own list of changed settings (its diff) was identical before and after.
Every page
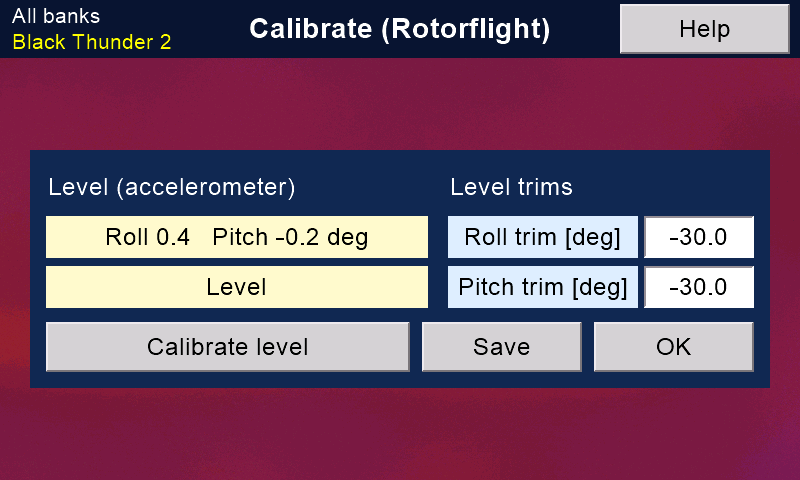
PIDs.Advanced PIDs.Rates.Governor.Rescue.Servos.Mixer.Gyro filters.An adjustment on a knob.Battery.Black box.Calibrate the level.Settings.A whole set-up saved as text.
Still on the phone or computer: ESC set-up, motor test, the black-box vibration check, the new-helicopter wizard and the ports. See Rotorflight from your phone.
Telemetry and link checks
See how the model is doing, and exactly how well the radio link is working.
From the model
From a Rotorflight model (through either receiver): head speed, current, capacity used, ESC temperature and flight-pack volts per cell.
With a Version 1 receiver and its sensors: GPS position, speed and distance, height from air pressure, vario tones and temperature. The Version 2 receiver does not send these.
The link, in detail
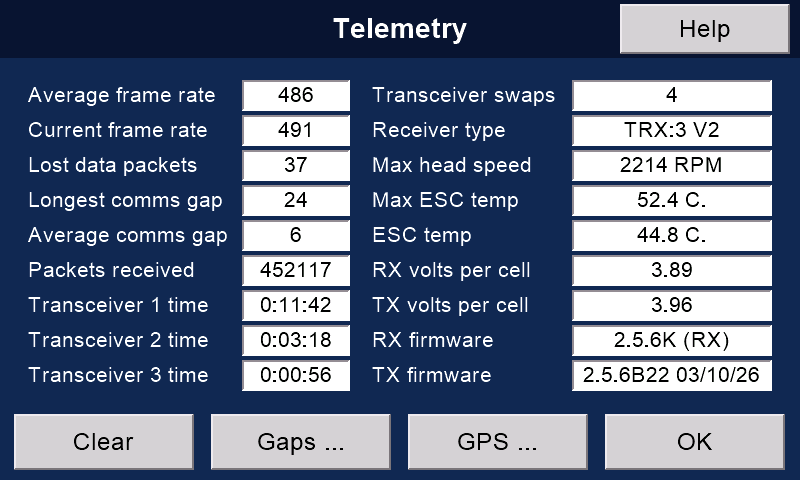
Telemetry page: packets a second (now and average), lost packets, the longest and the average gap, and which of the receiver's radios (up to three) has been working, for how long.
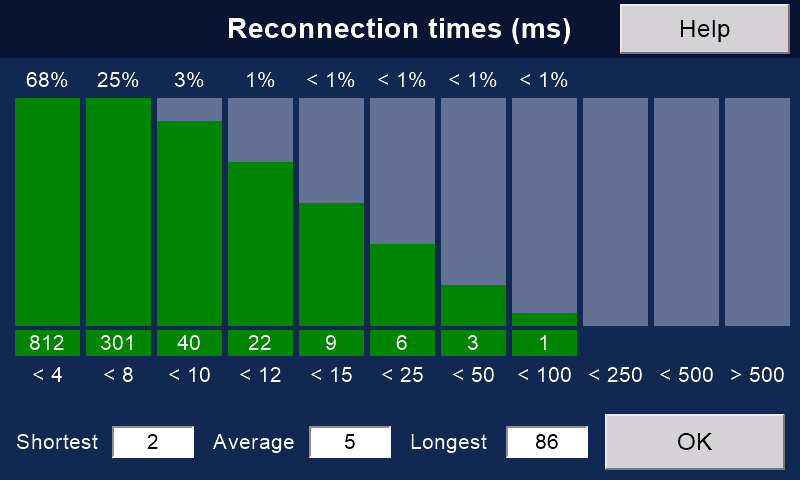
Reconnection times: a chart of how long each break in the link took to mend, from under 4 milliseconds up to over half a second. We have not seen this chart on other radios.
A pilot notices a break only if it lasts more than about a third of a second.
Link quality shows as a bar on the front screen.
Interference scan
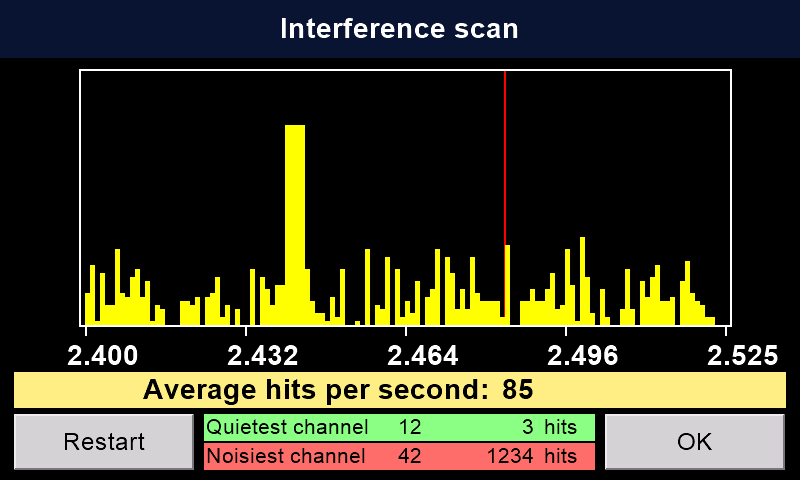
Press Scan RF to see radio activity on every channel from 2.400 to 2.525 GHz. It names the quietest and the noisiest channel. Useful at a busy field.
Log files
One dated log a day (switch on Keep log files in System → Advanced): connections, gaps, banks, motor and safety changes, buddy changes, battery, top head speed, current and ESC temperature, capacity used and packet totals.
Read and delete them on the screen. Over 90, the oldest go, leaving the newest 80.
Measured on the first V2 flight
A Goblin RAW 420, 5 October 2026. The link averaged 491 packets a second. It lost 935 of 444,448 packets (0.21 %). The longest gap was 15 milliseconds.
The Telemetry page (sample numbers).Reconnection times (sample numbers).Interference scan of the 2.4 GHz band.One log a day.Inside a log.
Updates and connections
The transmitter keeps itself up to date from the internet. It can update the receiver too.
One button updates everything New in V2
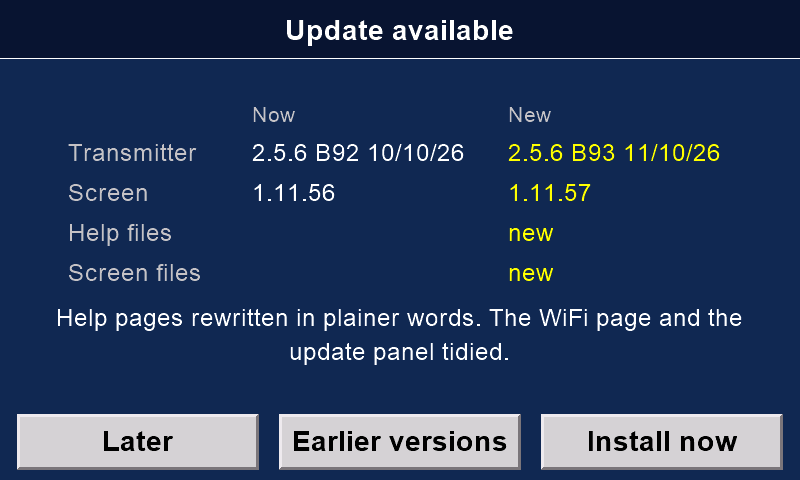
Go to Transmitter setup, then Transmitter updates. It checks messiter.com.
It updates the screen, the screen's card, the main board and the help texts.
Everything is downloaded and checked first. Nothing is installed until you press Install now.
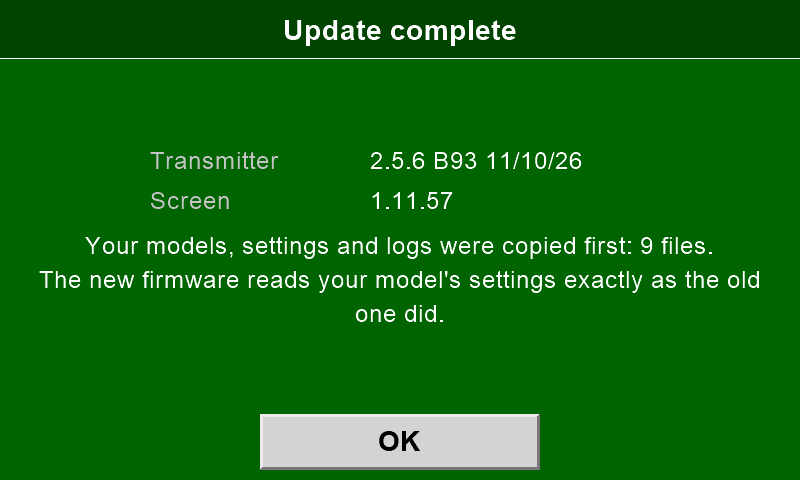
Your models, settings and logs are copied to the screen's card first. No copy, no update.
Only on the ground: the safety must be on, and no model may be connected.
Updates that put themselves back New in V2
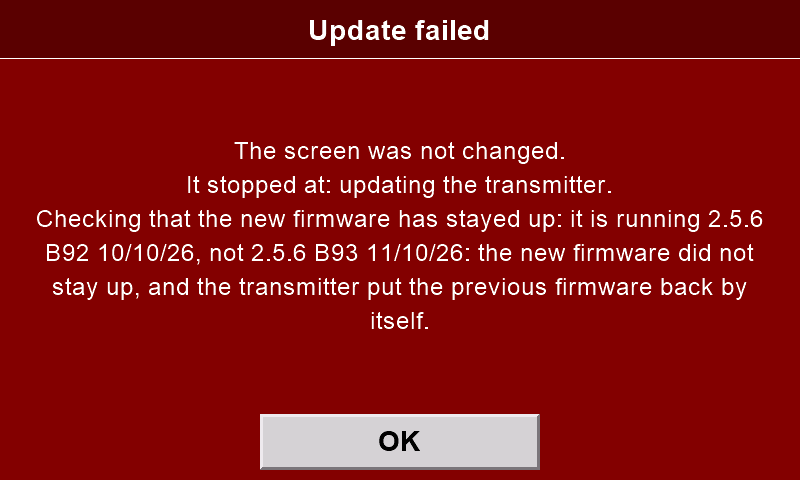
New main-board firmware runs on trial for 30 seconds. If it fails to start three times, the old one comes back.
The new firmware must read every model's control settings exactly as the old one did. If it does not, the old firmware comes back by itself, and the screen says why.
Earlier versions puts back any of the last three releases.
Receiver updates through the transmitter Needs a V2 receiver
Go to Model setup, then Receiver updates, with the model on and connected, with the safety on (with no safety switch: the motor off).
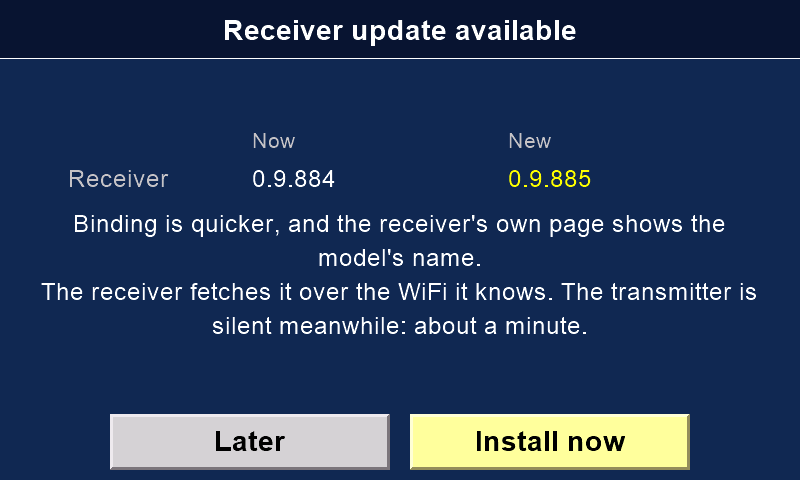
The transmitter sends the order over the radio. The receiver fetches the update over the WiFi it knows. No password goes over the air.
The transmitter goes quiet for about a minute while the receiver updates. Keep the model switched on until the result shows, in green or red.
At the field, give the receiver your phone's hotspot once, in the phone app.
Send a model to a friend
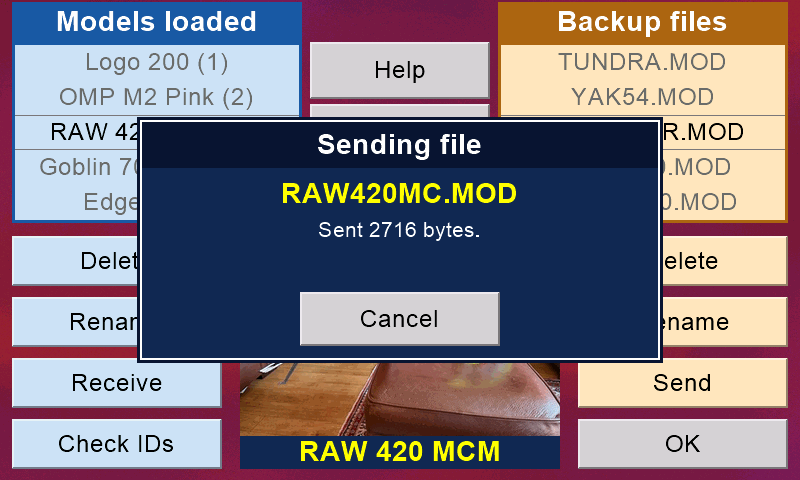
Send a model memory to another transmitter over the radio link. No cable and no card.
The model's ID goes with it, so automatic model selection works at once.
Every packet is numbered and the file is checked. If anything goes wrong, the old file stays.
Tested from Version 1 to Version 2, and between two Version 2s.
Press Send and Receive in either order, within 15 seconds.
WiFi and Bluetooth New in V2
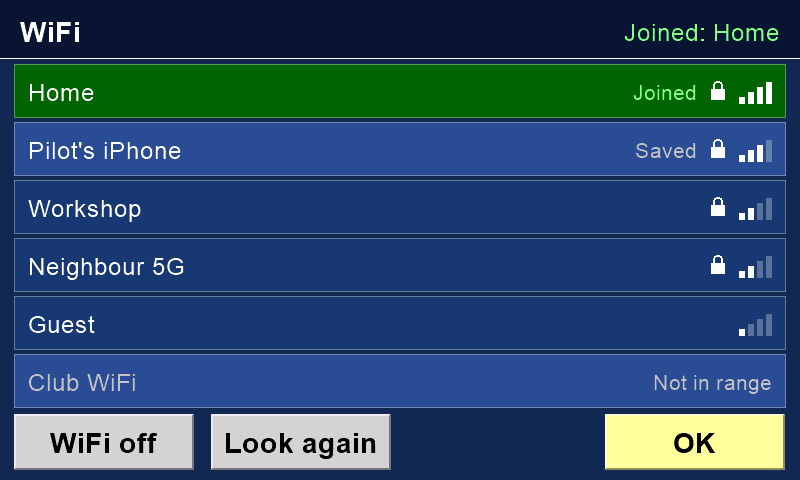
Choose a network and type its password on the screen's keyboard, once. It remembers up to 8.
At the field, a phone hotspot works. On an iPhone, turn on Maximise Compatibility. Only 2.4 GHz WiFi works.
Passwords stay in the screen. They are never in the files we publish.
The clock sets itself from the internet.
Bluetooth links the screen to a Version 2 receiver for Rotorflight. One device at a time: close the phone app first.
One button checks for updates.Earlier versions, one touch away.New firmware runs on trial.Update complete, models checked.It puts the old firmware back by itself.A receiver update, offered on the transmitter. Older screens say about 2 minutes; the real wait is about a minute.The transmitter waits quietly.Done.Sending a model over the air.And receiving it.Pick a WiFi network.Type its password once.
Help on the screen
Press Help on a page to read about that page, in plain words.
There are 60 help texts. They update with the transmitter.
Close the help and you are back where you were.
Help for in-flight adjustments.Help for the black box.
Safety, built in
Rules that keep the model under control, whatever else is going on.
Safety switch. It stops the motor starting by accident. With a Rotorflight model it is also the arm switch.
Radios off when the model could fly. WiFi and Bluetooth switch themselves off when the safety is off (or, with no safety switch, when the motor is on). The main board decides this, not the screen.
Nothing changes in flight. No transmitter update, file transfer or restart starts while a model is connected. A receiver update runs only with the safety on, and the receiver refuses while armed.
Rotorflight pages need the safety on. Land and disarm first.
Motor on brings up the front screen, so you always know what you are looking at.
No switching off by mistake. While a model is connected, the power button needs a long press, with a countdown.
Auto power-off after 5 to 60 minutes unused. Never while connected.
Battery warnings. Transmitter battery low at a level you set. "Stop flying!" at the flight-pack voltage per cell you set. A current warning too.
Status light. Red: trying to connect. Green: connected. Blue: busy, for example updating.
Closed to the network. On WiFi the screen answers nothing but its status, until you open its "workshop door" on the screen. Safe on a club network.
Safety: check before you fly
After any update or change, check every control before you fly: directions, end points, mixes and switches.
Safety off: WiFi and Bluetooth go off.No updates while a model is connected.BATTERY LOW, in red, on the screen you fly with.
Voice, sounds and a game
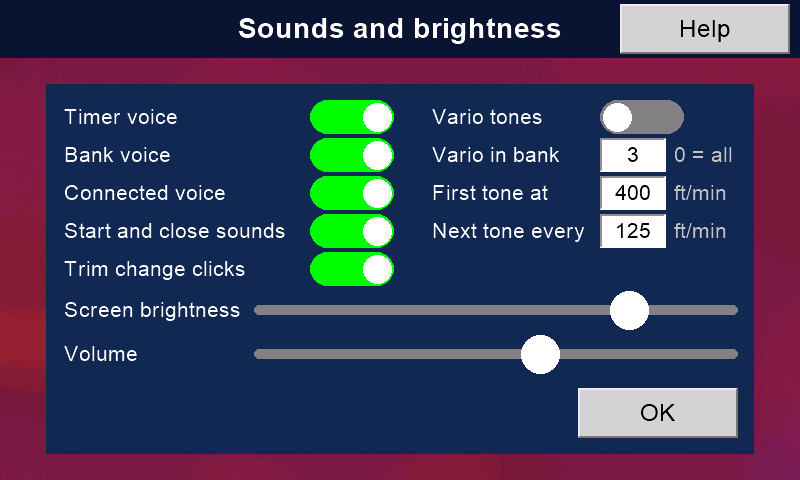
Spoken messages: connected, model found, motor on or off, safety on or off, bank names, rates, "Master" or "Buddy", battery low, "Stop flying!" and a countdown.
Choose a sound for each moment, trim clicks included. Set the volume and the screen brightness.
Vario tones for gliders, with a Version 1 receiver and a pressure sensor.
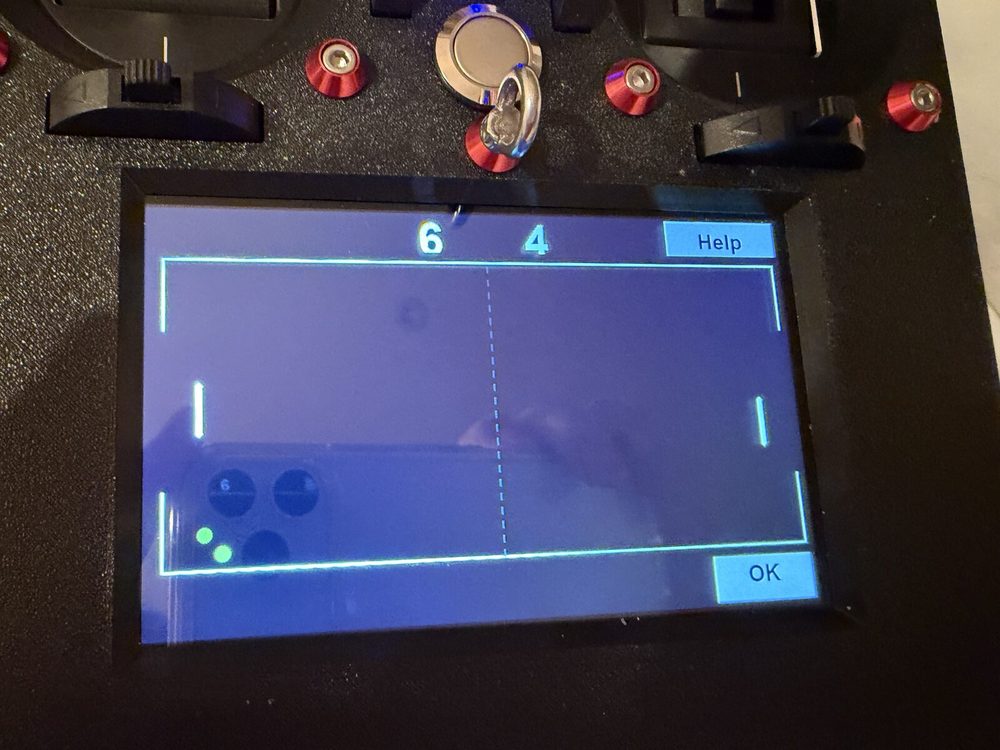
When it rains, press Raining and play Pong with the sticks.
Voice, sounds and brightness.Pong, for rainy days.
What it is made of
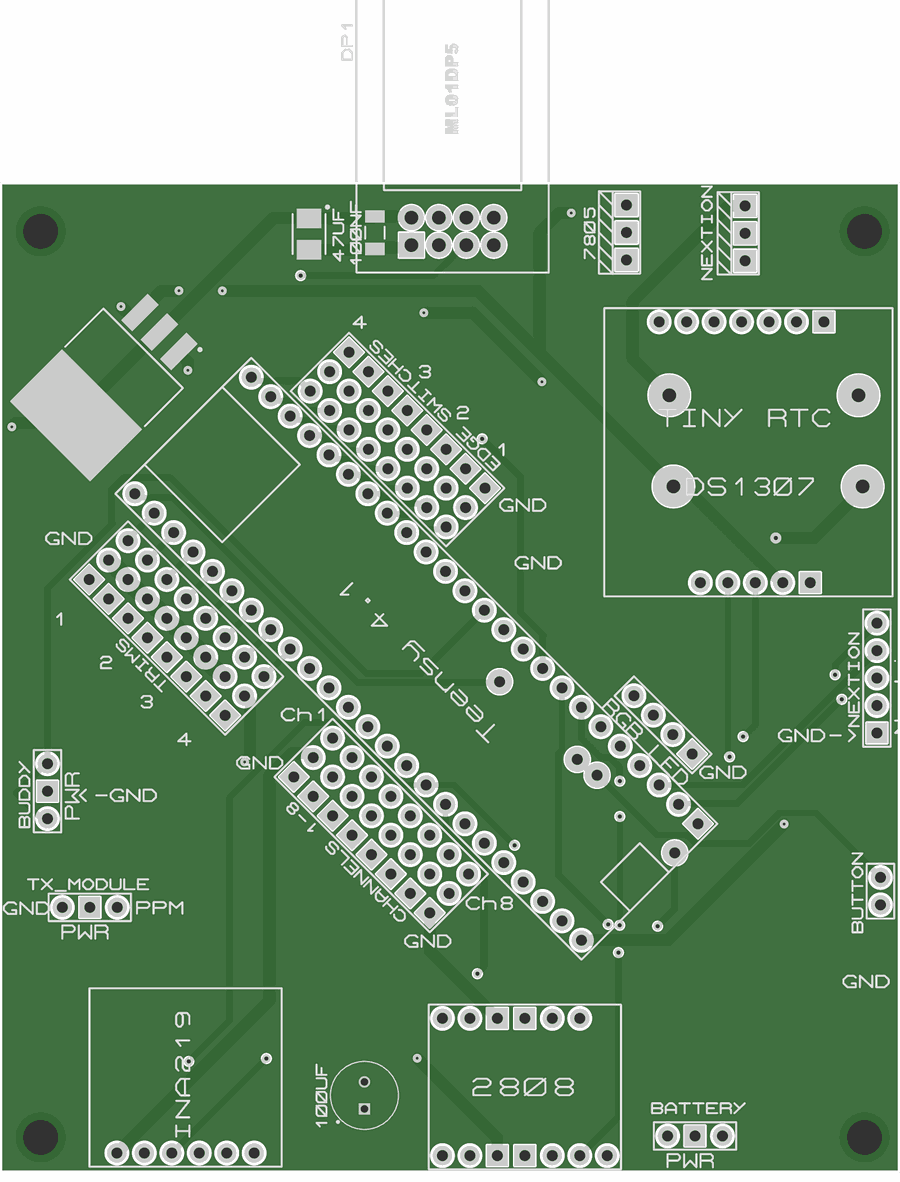
Parts you can buy, a circuit board you can order, and a case you can print. The full parts list and the steps are on Build one.
Part
What it is
Main computer
Teensy 4.1 (600 MHz). It reads the sticks, mixes and runs the radio link.
Screen
Elecrow CrowPanel 5.0 (ESP32-S3), 800 × 480 touch. WiFi, Bluetooth, its own speaker amplifier and memory card.
Radio
nRF24L01+ module with an amplifier (Ebyte ML01DP5), on an external 2.4 GHz aerial.
Link
500 packets a second; channels in 12-bit slots, about 2,000 steps each (11-bit to the flight controller over CRSF or SBUS); about 100 hops a second across 83 channels. The receiver chooses each hop.
Sticks
Two FrSky M9 Hall-sensor gimbals.
Trims
Four digital trim switches.
Switches
Eight three-position switches: four on the top edge, four on the front. Any front one can be a knob.
Power
A 2-cell pack (LiPo, Li-ion or LiFePO4) and an electronic power switch. A USB-C charger is optional.
Clock
DS1307 real-time clock. The screen sets it from the internet.
Storage
Two microSD cards: one for models, logs and help; one for the screen's pages, sounds, pictures and backups.
What ours does that commercial radios do not, and why it keeps getting better.
Yours to change
LockDownRadioControl changes when a need appears. Its author, Malcolm Messiter, often adds a feature within a day of a pilot asking for it: the transmitter's command line and the defined front screens were each built the day they were asked for. The new version then reaches every transmitter and receiver over the internet.
It is yours to change too. Every line of code, the circuit boards and the case are open, so you can change anything yourself, or ask for it.
Commercial systems are almost always take it or leave it: you fly what the maker decided, and you cannot easily change it.
Range, and what really limits it
ExpressLRS is rightly praised for its range, and its claims are fair. But with a model helicopter, the radio is not what limits range. Your eyesight is.
In Malcolm's own tests at ground level, LockDownRadioControl Version 2 kept its link at more than a kilometre. The makers of its radio modules claim more than two. Nobody can see a helicopter well enough to fly it at a kilometre, so more range than that makes no difference in the air.
What matters more is that the link never fails. Now and then a commercial radio fails and a model crashes, through a faulty part or faulty assembly. Commercial makers must make a profit, so they have every reason to build quickly and with economical parts. LockDownRadioControl is not built for profit. In about six years of flying, it has never had a radio failure, nor any problem with range.
Radio rules
The radio modules that do the transmitting and receiving carry the CE mark and FCC ID 2ALPH-E01: Ebyte's E01-ML01DP5 in the transmitter and E01-ML01SP4 in the receiver.
They run at about 100 mW (20 dBm), the UK and EU limit for 2.4 GHz. An aerial cannot add power: it only shapes where the signal goes.
As with any model you build yourself, check the radio rules where you live before you fly.
Feature by feature
We checked each maker's own documents and shop prices in October 2026. "Not found" means we did not find it there; it does not prove the feature is missing. "Not confirmed" means the maker's words were unclear. "Not checked" means we did not look.
Feature
LockDownRadioControl V2
EdgeTX + ExpressLRSRadioMaster, Jumper
FrSky EthosX20 family
SpektrumNX10+, iX20
VBar ControlMikado, VBar units only
Open, and you can build it
YesCode, circuit board, case and help texts.
PartlyOpen firmware on a radio you buy.
No
No
No
The right model memory loads by itself
YesRare: elsewhere found only on Multiplex SMART SX and VBar Control.
NoModel Match blocks the wrong memory.
Not found
NoModelMatch blocks the wrong memory.
YesAnother way: each model's settings live in its VBar unit.
Wireless buddy box, no extra hardware
YesWith nudge. The pupil's radio loads the model.
PartlyRadios with Bluetooth, or an extra module.
Yes
Yes
Yes
Send a model to another transmitter, no wires
YesOver the radio link, with the model's ID.
NoCard or computer.
Not confirmed
YesiX20, by Bluetooth.
PartlyFly a friend's model with your radio.
Updates from the internet, on the radio
YesGoes back by itself if new firmware will not start, or would read your models differently.
NoA computer and a browser.
NoUSB or card.
YesWiFi.
YesWiFi.
Receiver updated through the transmitter
YesVersion 2 receiver.
PartlyThe receiver's own WiFi page.
YesACCESS receivers.
Not checked
Yes
Link health on the screen
YesLost packets, longest gap, reconnection chart.
YesSignal strength, link quality.
YesSignal strength and valid frames (VFR).
YesFlight log: fades, losses, holds.
YesLink power and each aerial's signal strength.
A front screen you design
YesSix designs, twelve themes.
Yes
Yes
Yes
Yes
Help text on the radio itself
Yes60 help texts.
Not foundOnline manual.
Not checked
Not checked
YesA (?) button on every setting.
Rotorflight set-up from the transmitter
YesWith a Version 2 receiver.
YesRotorflight's own scripts: PIDs, rates, governor, rescue, servos, mixer, filters, battery, and ESCs of 8 makes.
YesWider: over 80 pages, ESC tools.
Not found
Not applicableSets up VBar units, not Rotorflight.
Back up Rotorflight on the transmitter
YesEvery bank; not ports, LED, GPS or ESC. Each restored setting is read back.
Not foundThe desktop Configurator does backups.
NoCopies profiles only.
Not applicable
Not applicableA backup app for VBar.
Edit with the model off, send later
Yes
Not found
Not found
Not applicable
Not found
Rotorflight command line on the transmitter
YesWith the USB cable.
Not found
No
Not applicable
Not applicable
Scripts and add-on apps
NoBy choice: kept simple.
YesLua.
YesLua.
YesAndroid apps on iX20.
YesApp store, some paid.
Mixer
4 flight modes, 32 mixes
Much deeper9 flight modes, 64 mixes, 64 logical switches.
Deep
Deep
Helicopter-focused
Channels
16
Up to 32ExpressLRS carries 16.
Up to 24
20
Not checked
Fastest update
500 a second
Up to 1,000 a second
Not checked
Not checked
Not checked
Bands
2.4 GHz
2.4 GHz and 900 MHz
2.4 GHz and 900 MHz
2.4 GHz
2.4 GHz
Range
More than 1 kmIn ground-level tests. The module makers claim more than 2 km.
Over 40 kmExpressLRS's own claim, clear line of sight.
50 to 100 kmFrSky's own claim.
Not checked
Not checked
CE-marked radio modules
YesEbyte E01 modules, FCC ID 2ALPH-E01.
Yes
Yes
Yes
Yes
Price, about
Over £120Parts priced so far. Switches, trims, radio module, battery, board, case and small parts add more.
The parts priced so far come to £120–£143, before the switches, trims, radio module, battery, circuit board, case and small parts. A budget EdgeTX radio is about £130.
It costs far less than the X20, NX10+ or VBar Control in the table. Ethos and Spektrum also make cheaper radios (a FrSky X14 is about £170).
Budget EdgeTX radios can already tune Rotorflight with Rotorflight's own scripts. We did not find the Rotorflight backup, editing with the model off, or the command line on any other radio.
Add your own time: a transmitter takes a few evenings, plus printing the case; a receiver about an evening.