Switches
The help for this page of the Version 2 transmitter, in its newest words. A transmitter on V2 B92 or older shows older words.
On the transmitter: Transmitter setupSwitches
What the switches do. Two pages open this help:
'Switches' on 'Transmitter setup' gives each of the eight switches its job: read The transmitter's switches, just below.
'Switches ...' on the Rotorflight menu sets what a switch makes the flight controller do: read Rotorflight switches, further on.
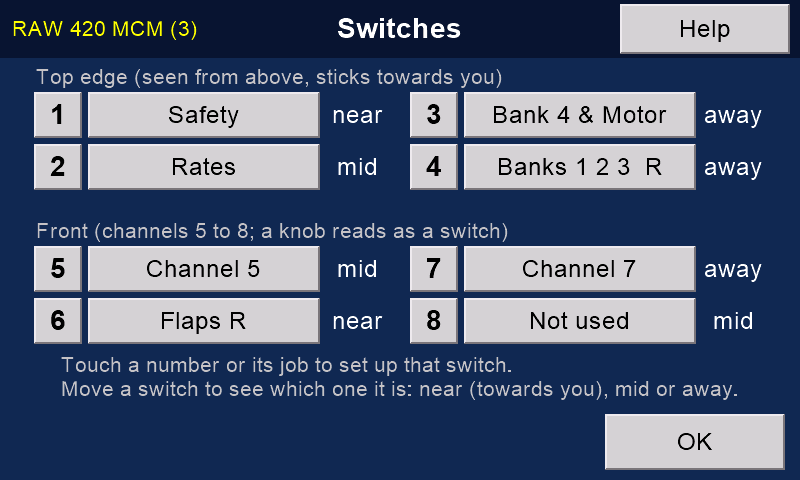
The transmitter's switches
Any of the eight switches can do any job. Touch a switch's number or its job to choose the job.
Switches 1 to 4 are on the top edge, shown as seen from above with the sticks towards you.
Switches 5 to 8 are on the front: the inputs of channels 5 to 8.
Given a job, a knob there works as a three-position switch.
Beside each job is where that switch is now: near (towards you), mid or away. Move a switch to see which number it is.
'R' after a job means that switch is reversed.
If a front switch shows no position, calibrate:
'Transmitter setup', then 'Calibrate'.
A front switch with no other job is its channel's input, marked 'Channel 5' to 'Channel 8' (or the channel's name, if you renamed it).
Any other job takes it from its channel, whose input then sits at its centre. Give that channel another input on the 'Inputs' page if you need one.
'Not used' does the same and nothing else.
For the buddy box, one switch needs the 'Buddy' job.
A spring-return switch is best: letting go gives control back to the instructor at once.
The jobs belong to the transmitter, not the model: they stay the same whichever model is loaded.
'OK' keeps them and goes back to 'Transmitter setup'.
Rotorflight switches
On the Rotorflight menu, 'Switches ...' sets what each switch makes the flight controller do: arm, rescue, self-level, the beeper, the black box and more (the Configurator's Modes tab).
It needs the safety on. With the model connected, it also needs a Version 2 receiver with Bluetooth.
With no model, it uses the model's backup on the card, if there is one. A 'Save' then changes the backup, and the change is offered to the model when it next connects.
The page
'<' and '>' beside the title step through the switch actions.
Tap the box beside 'Does' to choose another action. Drag the list until it is in the middle, then press 'OK'. 'Cancel' keeps the old one.
Tap the box beside 'on' for the next channel, 6 to 16 (after 16 it goes back to 6). Channel 6 is AUX1 in Rotorflight.
'Add' makes a new action: choose it from the list. It goes on the channel after the one showing, ON in the upper third of the travel.
Rotorflight holds up to 20 switch actions.
'Remove' takes away the action showing, after a question.
The bar
The bar is the channel's travel, 875 to 2125 microseconds (us).
The green zone is where the action is ON.
Drag the round ends to set the zone.
The marker line (white, edged in black) is where the switch is now: this transmitter's output, as the flight controller sees it (988 to 2012 us).
The line under the bar says ON or OFF.
The arm switch
The arm switch is this transmitter's safety switch. With a Rotorflight model, the safety drives the arming channel (set in 'Settings ...').
So the arm action stays on that channel. It cannot be swapped for another action, or removed.
'Save' refuses an ON zone that reaches 988 us: the model would arm with the safety on.
It also refuses one that stops short of 2012 us (safety off would not arm), and a set with no arm action.
Save and OK
'Save' appears once something is changed. It writes the actions that changed, stores them, and reads them all back to check.
'OK' leaves. If a change was not saved, it asks first.
Still stuck?
See common questions, or write to mmessiter@gmail.com. Say which page, and what the screen showed.